
Simple stuff: MLA-style formatting and presentation
| SSD | SSF | SSFE | SSFS | SSH | SSHF | SSI | SSJ | SSLI | SSLN | SSLP | SSLPN | SSM | SSN | SSP | SST | SSTF | SSTP | |
| Sample MS Word document formatted in MLA style | ||||||||||||||||||
Typed work: MLA-style formatting
The MLA (Modern Language Association) is the authoritative organization for scholars in language and literature. The MLA guidelines for formatting (and for citation and documentation) are the industry standard: they apply in most college English classes, in many other courses in the humanities, and in hundreds of scholarly journals and other publications. Parenthetical references below are keyed to the MLA Handbook for Writers of Research Papers, 7th ed., by Joseph Gibaldi (abbreviated below throughout as MLA HWRP).
SSP ("P" for "paper"): Formal essays written outside of class are printed via word processor in black ink, on white paper of copier-grade quality (20 lb. bond minimum) (MLA HWRP 4.6).
SSD ("D" for "double spacing"): Double space typed papers throughout their entirety, from your name at the top of the first page to the last line of text (block quotes included). Works cited pages are double-spaced as well—see Q5ds (MLA HWRP 4.2).
SSM (margins): one inch margins above, beneath, and on both sides of the text (excluding page number headers, which go a half-inch from the top right margin) (MLA HWRP 4.1).
Setting or checking margins in Microsoft Word:
Select the "Layout" tab, then click "Margins" and choose the option labeled "Normal," with one-inch margins on all four sides, if it's not already selected.
SSF
(font): Use only standard Times or Arial
fonts. Avoid exotic or "cute" fonts in formal writing. Aside from sometimes being more difficult to read, exotic fonts can suggest
whimsy or frivolity on your part—not subtle signals you want to send your reader!
Use the same font (and font size) for the entire document: the title, the
text, quotes, headers, works cited entries, everything.
SSFS (font size): Use only 12 point font size.
Text in smaller fonts can be hard to read; essays in larger fonts can look
like kindergarten work. Even when it is not the case, essays in font
sizes larger than 12 point (and/or with wider margins than normal) can make it appear that you
realized the paper was short and tried to hide it. Your professors are
not dummies! And you don't want them ever to think of you as "sly" in
covering up shortcomings in your work (MLA HWRP 4.2).
SSN (name, date, etc.): Double-spaced at the top
left margin of the first page only, in the same font and font size as the
text of the paper, list:
1) your name
2) professor's name
3) subject/discipline and course number (English 1102, e.g., not Composition II; History 2112, not U.S. History Since 1865)
4) date paper is turned in (MLA HWRP 4.3).
See sample MS Word doc formatted in MLA style.
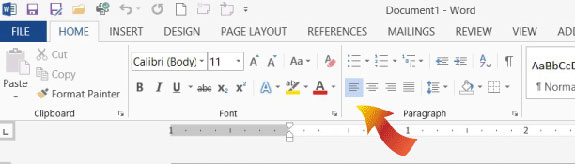
SSJ (justification): Align or "justify" the text
only on the left margin. Avoid "full justification," where
both left and right margins are ruler-straight, as in newspaper columns, e.g. (MLA HWRP 4.2). The arrow below points to the "left justify" button.
SST (title/title page): Titles are mandatory,
title pages are unnecessary. Some professors prefer title pages
for formal papers and other printed work, but MLA guidelines require no title page. Ask professors who don't specify if they
do expect title pages.
Titles: Give each formal essay its own unique title. "Paper 3" or "Essay One" is not an actual title. The original title of a literary work is that work's title and should not be used as the title of your essay. If you submit a paper entitled "Frankenstein," your professor might say, "Great title! But that one is Mary Shelley's—where's yours?" Also note that titles do not require periods at the end.
As stated in the Harbrace College Handbook, Revised 13th ed, "A good title fits the subject and tone of an essay. The title is the reader's first impression and, like the introduction, should fit the subject and tone of the paper. Sometimes the title announces the subject simply and directly: 'Grant and Lee' or 'Civil Disobedience.' Often a title uses alliteration to reflect the writer's humorous approach, as in "A Pepsi Person in the Perrier Generation,' or a twisted cliché, as in 'The Right Wrong Stuff.' A good title may also arouse the reader's curiosity by asking a question, as does 'Who Killed the Bog Men of Denmark? And Why?'" (360).
Except for brief questions, titles should not generally be complete sentences, but instead should be brief phrases, as in "Gender Roles Gone Awry" or "Cell-Phone Hell"
SSTP (title position): Center your title, double-spaced
immediately beneath the date—include no extra spaces between
date (SSN) and title, or between the title and the text
of your paper. As noted above (SSD), the entire paper should be uniformly
double-spaced from your name at the top of page one to the end of the document (MLA HWRP 4.3).
SSTF (title font): Use the same font and font
size for the title and the text of the essay; titles should not be underlined, put in quote marks, in all caps, italicized, or in bold font (MLA HWRP 4.3).
SSI (indention): Use the <Tab> key to
indent the first line of each paragraph one-half inch from the left margin. Using the tab key keeps indentions uniform throughout the essay (MLA HWRP 4.1).
SSH (header): At the top right corner of each
page, including the first page and Works Cited pages, put your last name, one typed space (only), and the page number in a "header." Headers should be one-half
inch from the top of the page and aligned hard (flush) on the right margin (MLA HWRP 4.4). Rather than "tabbing" over to the right side of the page or using the space bar, you will save time and trouble in
the long run by learning to create proper headers with
the alignment justified "hard right" (see instructions below). Headers
should not include the word "page" or the abbreviation "p.," nor should there
be a comma, dash, hyphen, bracket, or any other typographical symbol before
or after the page number. For instructions on creating
and modifying headers in Microsoft Word, see below.
- To align
the header hard on the right margin: with the cursor in the header box (i.e. above the dotted line),
press the control (<Ctrl>) and "r" keys simultaneously, and the flashing cursor should now be at the hard right margin of the page.
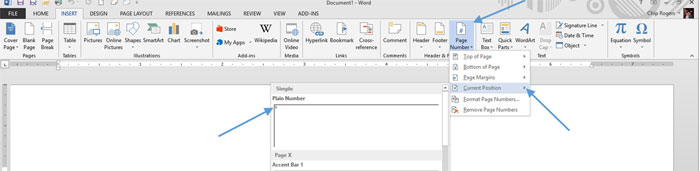
- Type your last name followed by a single typed space and no punctuation, then select the "Insert" tab at the top of the Word toolbars menu, then locate the "Header and Footer" section of the toolbar that now appears and click "page number"; select "Current Position" (where you last left the cursor, one space to the right of your last name), then choose the "Plain Number" option (the first one displayed).
- To change
header font and font size to match the body text of the essay,
still in the header view mode (with the dotted line containing the "header" tab), press the control (<Ctrl>) and "a" keys together to select all the
text in the header box, then right-click and change
the font and size values as needed.
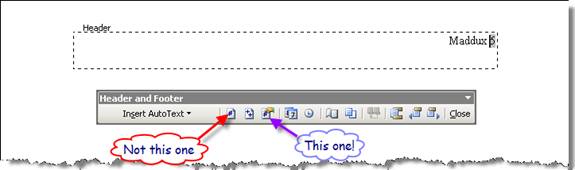
- To make other header changes, such as distance from top of page (should be a half inch), click the green "Header and Footer Tools" tab on the top row of the MS Word toolbar menu for a number of more specific header design options.
- Double-click anywhere below the dotted line to return to the body of the document, and the header should now appear slightly faded gray on the screen.
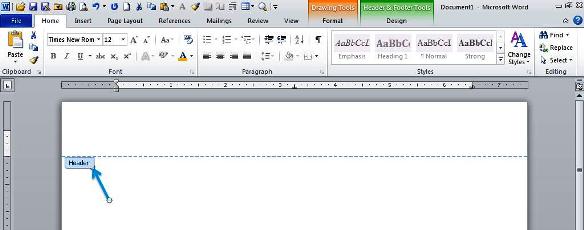
Creating or modifying a header in Microsoft Word
To add or edit a header, double-click in any space at the very top of the page (within one inch from the top edge of the page on-screen). A dotted line should appear with the word "header" in a tab near the left margin (see arrow in the image below).
SSHF (header font): Make headers, including
both your last name and the page number, the same font and font size as the text
of the essay. See instructions for creating and modifying headers above.
Works cited
note: There's no reason in a paper shorter than 30 pages to create
or save your works cited page in a separate file from that in which the
text of the paper is saved. If, however, you do make the works cited
page a separate document, you will need to change the page number formatting
in the header for the works cited page. Go through the necessary steps
above separately for the works cited page, but also click the "Page Number" button, select "Format Page Numbers," then select "Start at" and enter the appropriate page number in the box and click "OK."
Page break
tip: To set a page break after the text of your essay so that the works
cited page automatically begins on a separate page, press the control (<Ctrl>) and
enter keys simultaneously.
For reference, see this correctly formatted sample MS Word document.
![]()
Handwritten
work:
SSLN ("LN" for "longhand" and "name"): In the
upper left corner of the first page of all handwritten assignments, write
- your name,
- the course number (e.g. English 1101), and
- the day's date.
SSLPN
("longhand" and "page number"): Put your
last name and the page number in the upper right corner of all pages after the
first.
SSFE ("frayed edges"): Avoid turning in work on
pages with frayed or tattered edges—i.e. pages ripped from a spiral
notebook (without fine perforations). Turning in work on pages with frayed edges is like going to
court in clothes spotted with stains and riddled with holes. In court
you hope the judge or jury will hear your side of the story impartially
no matter how you dress. Invariably, though, defendants with common sense
wear nice clothes in court, dresses or coats and ties even, no matter how
obvious their guilt or innocence. All work you submit to your professors
is "judged," too, including assignments that are not given grades, so you should
always "look your best" even if you're guilty of missing a day's reading or
screwing up a lab experiment.
SSLI ("longhand" and "ink"): Unless instructed
otherwise, use only pencil or blue or black ink on all handwritten assignments. Pink, purple, lime green, and aqua are beautiful colors, and sparkly, glittery
ink is truly nifty. But your academic work should reflect professionalism even in the smallest details, such as ink color. Use the cool-colored
ink for taking notes, but stick to the basic black, blue, or pencil for work
you turn in. Express your individuality in the substance of your written
work, not in its visual presentation.
SSLP ("longhand" and "paper"): Use only
standard 8.5x11-inch notebook paper. Turn in handwritten assignments
only on standard sized notebook paper. Legal-size paper and paper smaller
than 8.5x11 inches can be difficult to file or paper clip with "normal" sized
pages, and smaller pages can fall out of stacks of papers like those irritating subscription
cards in magazines. Your work should stand out from the rest of the stack
in substance and quality, not literally by separating itself from the others
on the classroom floor!
Why do these picky things matter?
Your work should speak for itself—in its quality. If you write a brilliant essay, it shouldn't matter if you pen it in purple ink on tattered paper that measures four inches by six. And in most cases, your work will indeed be judged on its merits and not by its presentation. But each and every assignment you turn in should reflect your professionalism in every detail. If you are the kind of person who would bathe, shave, fix your hair, and dress nicely for an important job interview, you should attend to the details and make sure that all of your academic work is similarly clean and spiffy before you turn it in. You care deeply about each and every scrap of your college work, right? Even if you don't, it's never a good idea to send your professors even mildly negative signals, however subtle, about you or your work.
Updated 8/19/2024